ESP32 & BME280 & LAMP/WAMP Stack Part 1
So, with COVID-19 keeping everyone locked up, a friend brought up the idea of playing with micro-controllers. I wish I could say that the experience was the reason for a few more grey hairs {an excuse is always good ;-)}, but alas it was a breeze to set up. In this article I will document my process and eventual success.
Parts for Sensor
To get the sensor side of this working you will need the following:
- Breadboard.
- Jumper Wires.
- ESP32 Micro-controller.
- BME/BMP280 Temperature/Humidity/Pressure Sensor.
- USB Power supply with Micro USB cable.
- Arduino IDE.
- BME/BMP280 Libraries for the IDE. {you will need to read up on Arduino IDE page, they are very easy to install, just follow their instructions}
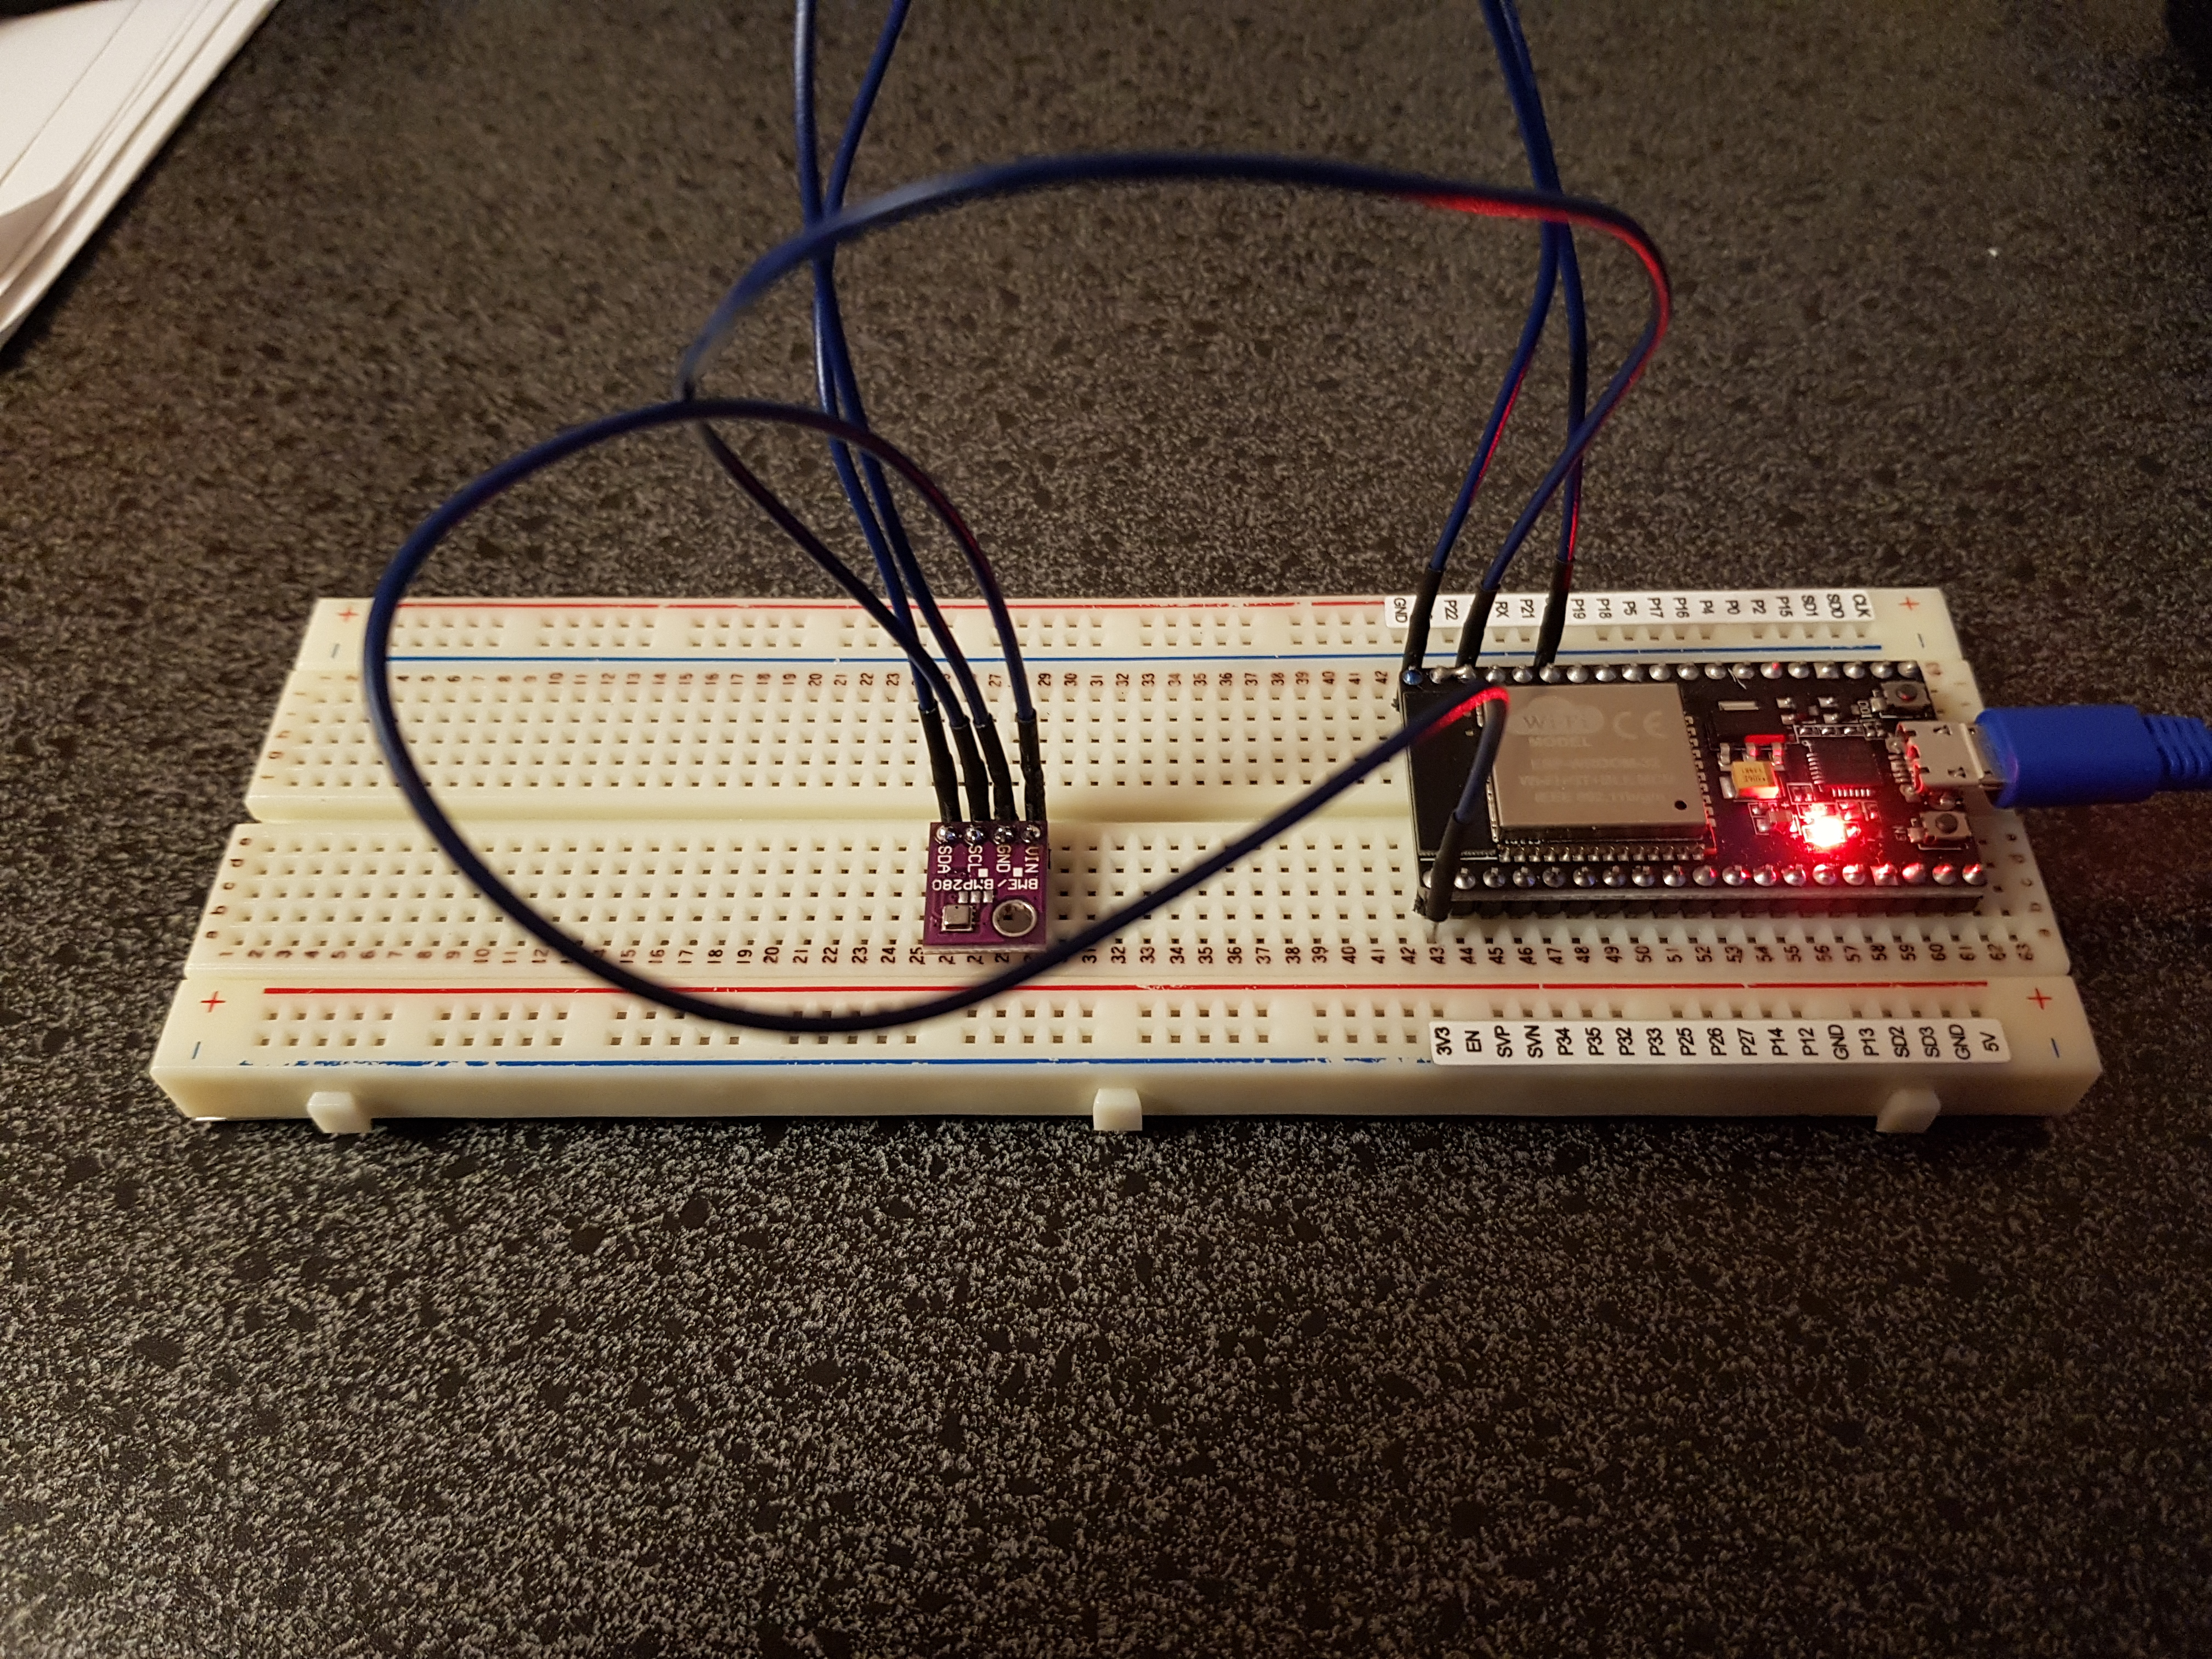
Hardware Assembly
The instructions I used to assemble my sensor system on the breadboard may be different than yours, depending on the version of micro-controller/sensor you have bought.
| ESP32 Pin | BME/BMP/280 Pin |
| GPIO 5 | CS (Chip Select) |
| GPIO 23 | SDI (MOSI) |
| GPIO 19 | SDO (MISO) |
| GPIO 18 | SCK ( SPI Clock) |
Power will be supplied to the ESP32 via the Micro USB connector. At this point the basic sensor system from a hardware perspective is considered complete.
The Web Server
WARNING ---- I assume that if you would like to repeat anything I have done here, that you will go through the processes of properly securing the server from the plethora of attacks out there. You have been warned.
I will discuss the two PHP scripts and one SQL script that I will give you, at the very least you will be able to see the fruits of your labor. These scripts are:
- storing the data in the database.
- getting the data and displaying it.
SQL for Data Storage
The following SQL is used to generate the table needed to store store the data generated by the sensor.
drop table if exists readings;

create table readings
(
    id int not null auto_increment,
    sensorId varchar(50) not null,
    readingId int not null,
    temperature decimal( 5, 2 ) null,
    humidity decimal( 5, 2 ) null,
    pressure decimal( 8, 2 ) null,
    creationDateTime datetime not null,
    primary key ( id )
);
The drop table is used to remove an existing table if there already is one. This will forever erase the reading table if it exists.
The create table command is simple in that it generates the table with the following columns to store the readings.
- id - is unique identifier that ensures you can reference each row by it.
- sensorId - this is the unique identifier of the sensor, at some future point you will be able to store the information from multiple sensors in the same table and use this identifier to group the data.
- readingId - this value will be generated on the ESP32 to uniquely identify each reading. This is an after effect of some networking issues I was having.
- temperature - the sensor will generate a number that, in all cases I can see would range from -40C to +50C with 2 places of decimal accuracy ie 0.01.
- humidity - the sensor will generate a number that, in all cases I can see would range from 0% to 100% with 2 places of decimal accuracy ie 0.01.
- pressure - the sensor will generate a number that, in all cases I can see would range from 0hPa to 1000000hPa with 2 places of decimal accuracy ie 0.01.
- creationDateTime - the timestamp of when the reading took place.
The primary key line is just to tell database which column is the primary key/unique row identifier.
PHP Code for storing the data
Here is the code to store the data in a database. This code is simplified and not secure, as anyone can inject data, as I said above you need to secure the data flow.
<?php
  ini_set( 'display_errors', 1 );
  ini_set( 'display_startup_errors', 1 );
  error_reporting( E_ALL );

  $databaseHostname = "YOUR DATABASE HOSTNAME";
  $databaseName = "YOUR DATABASE NAME";
  $databaseUsername = "YOUR DATABASE USERNAME";
  $databasePassword = "YOUR DATABASE PASSWORD";

  $date = new \DateTime( 'now' );
  $timestampForDatabase = $date->format( 'Y-m-d H:i:s' );

  $connection = new \PDO( 'mysql:host='.$databaseHostname.';dbname='.
                          $databaseName.';',
                          $databaseUsername,
                          $databasePassword );

  $connection->setAttribute( \PDO::ATTR_CASE, \PDO::CASE_NATURAL );
  $connection->setAttribute( \PDO::ATTR_ERRMODE, \PDO::ERRMODE_EXCEPTION );

  $query = 'insert into readings
            ( sensorId,
              readingId,
              temperature,
              humidity,
              pressure
              creationDateTime )
            values
            ( :sensorId,
              :readingId,
              :temperature,
              :humidity,
              :pressure,
              :creationDateTime )';

  $statement = $connection->prepare( $query );

  $sensorId = $_GET[ 'sensorId' ];
  $readingId = $_GET[ 'readingId' ];
  $temperature = $_GET[ 'temperature' ];
  $humidity = $_GET[ 'humidity' ];
  $pressure = $_GET[ 'pressure' ];

  $statement->bindParam( ':sensorId',
                         $sensorId,
                         \PDO::PARAM_STR );
  $statement->bindParam( ':readingId',
                         $readingId,
                         \PDO::PARAM_INT );
  $statement->bindParam( ':temperature',
                         $temperature,
                         \PDO::PARAM_INT );
  $statement->bindParam( ':humidity',
                         $humidity,
                         \PDO::PARAM_INT );
  $statement->bindParam( ':pressure',
                         $pressure,
                         \PDO::PARAM_INT );
  $statement->bindParam( ':creationDateTime',
                         $timestampForDatabase,
                         \PDO::PARAM_STR );

  $statement->execute();
Going through the code:
- The two ini_set and one and error_reporting lines are used to tell the PHP that it should show all errors... this makes it easier to debug. <Optional>
- The $databaseHostname contains the url of the database.
- The $databaseName is the schema of the database.
- The $databaseUsername is the username for the credentials that are being used to connect to the database.
- The $databasePassword is the password for the credentials that are being used to connect to the database.
- The $date is the DATE object to generate the current Date Time from.
- $timestampForDatabase is the formatted string of the current Date Time using the format Year-Month-Day Hour:Minute:Seconds ie 2017-12-15 14:42:21. It uses the 24 hour clock.
- The $connection is the generated connection "object" using the settings passed to it. I am not checking to see if the connection got through. You can add the verification yourself.
- The next two setAttributes are used to tell the database connection that it should not ignore cases in letters, and should throw exceptions when an error occurs. This makes debugging a bit easier. <Optional>
- The $query is the SQL query in PDO format to allow injection of the received data. This does not do the actual saving it is just the command used to do it.
- The $statement is just the SQL Query from above being converted into an object that allows itself to be injected with the sensor readings.
- The next four lines get the information from the URL that was sent from the sensors. As an example, the request might be: www.sensor.com/index.php?sensorId=12123&readingId=36849&temperature&20.0&humidity=30.0&pressure=909999 this would give the values of:
- sensorId = 12123
- readingId = 36849
- temperature = 20.0
- humidity = 30.0
- pressure = 909999
- The next 5 bindParam, do the injection of the sensorId, readings and timestamp into the PDO SQL statement.
- The final command executes the SQL command and does the actual insertion of the data into the database. There is no error checking here. You should do error checking.
As you have noticed there is no error checking being done. The reason being is that the data insertion system is headless, meaning that no one will see anything when data is inserted. I would suggest adding error checking in two spots, the connection generation and the SQL query execution statements. In both locations you should add something that would log the failures of either to a file or the database {your call}. This will allow you to see what went wrong, if something goes wrong in the system. <Optional>
PHP Code for Data Viewing Page
The following is the php code for the web page to see the data. I will be outputting the data in a simple html table format.
<?php
  ini_set( 'display_errors', 1 );
  ini_set( 'display_startup_errors', 1 );
  error_reporting( E_ALL );

  $databaseHostname = "YOUR DATABASE HOSTNAME";
  $databaseName = "YOUR DATABASE NAME";
  $databaseUsername = "YOUR DATABASE USERNAME";
  $databasePassword = "YOUR DATABASE PASSWORD";

  $date = new \DateTime( 'now' );
  $timestampForDatabase = $date->format( 'Y-m-d H:i:s' );

  $connection = new \PDO( 'mysql:host='.$databaseHostname.';dbname='.
                          $databaseName.';',
                          $databaseUsername,
                          $databasePassword );

  $connection->setAttribute( \PDO::ATTR_CASE, \PDO::CASE_NATURAL );
  $connection->setAttribute( \PDO::ATTR_ERRMODE, \PDO::ERRMODE_EXCEPTION );

  $query = 'select
              r.temperature,
              r.readingId,
              r.humidity,
              r.pressure,
              r.creationDateTime
            from readings r
            order by sensorId asc,
                     creationDateTime desc';

  $statement = $connection->prepare( $query );

  $statement->execute();

  $resultSet = $statement->fetchAll( \PDO::FETCH_ASSOC );

?>
<html>
  <head>
    <meta charset="utf-8">
    <meta name="description" content="Sensor System">
    <meta name="author" content="Andy Quatember">
    </script>
    </head>
    <body onload='render();'>
      <div>
        <h1>Sensor Data</h1>
        <table>
          <tr>
            <th>Date / Time </th>
            <th>SensorId</th>
            <th>Temperature</th>
            <th>Humidity</th>
            <th>Pressure</th>
          </tr>
<?php
  foreach ( $resultSet as $singleRow )
  {
    echo '<tr>';
    echo '<td>'.$singleRow[ 'creationDateTime' ].'</td>';
    echo '<td>'.$singleRow[ 'sensorId' ].'</td>';
    echo '<td>'.$singleRow[ 'temperature' ].'</td>';
    echo '<td>'.$singleRow[ 'humidity' ].'</td>';
    echo '<td>'.$singleRow[ 'pressure' ].'</td>';
    echo '</tr>';
  }
?>
    </table>
  </body>
</html>
Going through the code:
- The two ini_set and one and error_reporting lines are used to tell the PHP that it should show all errors... this makes it easier to debug. <Optional>
- The $databaseHostname contains the url of the database.
- The $databaseName is the schema of the database.
- The $databaseUsername is the username for the credentials that are being used to connect to the database.
- The $databasePassword is the password for the credentials that are being used to connect to the database.
- The $date is the DATE object to generate the current Date Time from.
- $timestampForDatabase is the formatted string of the current Date Time using the format Year-Month-Day Hour:Minute:Seconds ie 2017-12-15 14:42:21. It uses the 24 hour clock.
- The $connection is the generated connection "object" using the settings passed to it. I am not checking to see if the connection got through. You can add the verification yourself.
- The next two setAttributes are used to tell the database connection that it should not ignore cases in letters, and should throw exceptions when an error occurs. This makes debugging a bit easier. <Optional>
- The $query is the SQL query in PDO format will get the data stored in the database and return it in data order and sensor order. The readingId is not being used, as it is being utilized in Part 2 of this article.
- The next three lines of code will execute the SQL query and send the put the retrieved data into an associative array.
- The next section is HTML, to create the basic page and table header for the data to be put into.
- The next section is a for loop to loop through the associative array and retrieve the data and generate the HTML for the data rows.
- Finally, the HTML to close the page.
This example does a very simple job of displaying the data. This can be extended to create pretty colorful graphs. I will leave that to you.
Conclusion
At this point we have completed the hardware, the web page to receive and display the data. In the next article I will talk about the C++ code for the ESP32 micro-controller.
If you have any questions, please email me!