Tabletop Simulator "Throttle Control"
Overview
With the COVID restrictions to in-person contact, our in-person gaming group was severely restricted, so we all agreed that we needed a mechanism to "fix" our gaming needs. One of our gaming group found Tabletop Simulator to play Zombicide. When we combined it with Discord, we were hooked.
Since the majority of our game-crew were "older", we had a love for old classic Avalon Hill games. The Tabletop Simulator system allowed anyone to use their API for free {you still need to own the game} to create content. We found the majority of our old favorites, and many new games that fixed the itch. Adding visual components like cards, maps, dice and booklets was easy, and could be done by anyone. Going the extra mile to create scripted content {games that had built-in logic to manage facets of the game} was significantly more difficult and required a bit of "programming" magic.
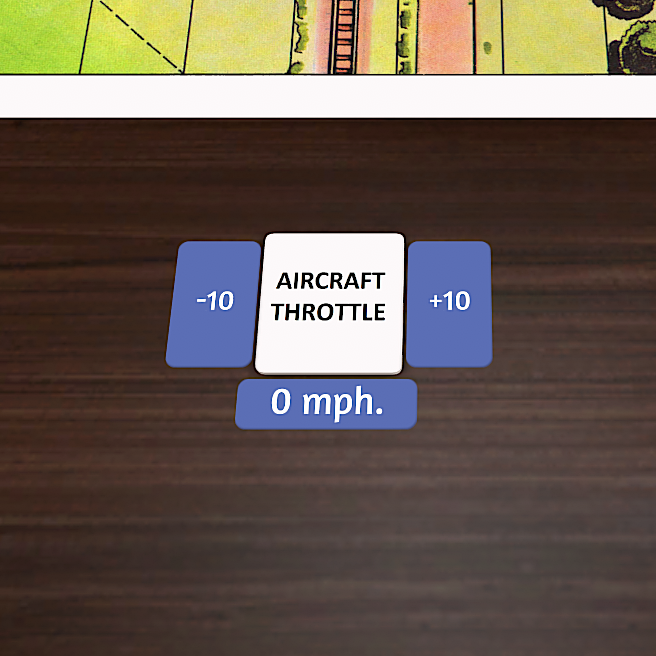
We have been playing Dawn Patrol on TTS, and we used their note cards to manage the hits on the aircraft and throttle and speed. This was a poor solution so I decided to do some code-fu.
I will walk you through the steps to create a simple Throttle Control for Dawn Patrol.
Requirements
The following assumes you have a text editor {I would suggest notepad++, as it supports LUA syntax highlighting}. You also need the ability to make files available online {serve them on your file server or on Steams, I will not go through this process}.
I decided on using the following requirements:
- It needed to hold the current speed in mph.
- It had to allow adjustments of +10mph and -10mph.
- It needed to "save" information during game saves.
- It should allow a range of 0mph to 200mph, more than adequate for Dawn Patrol.
Steps
Here are all the steps that you need to do to reproduce this control.
- Create an image that is square and has the text Aircraft Throttle written in the middle of the image. Save it with a 8 character name { ie abcd1234, jdwi9363, etc }. The reason you do this is that when you change the image you change the filename, so that it gets reloaded instead of pulled from the TTS cache if you use the same name.
- Upload the file to a publicly {no passwords allowed} available location and get the URL.
- Start Tabletop Simulator.
- Start a private game of Classic / Custom {this is a blank game template}.
- Click on Object Menu Item.
- Click on Components.
- Click on Custom Tile.
- Define the type, I am a fan of Rounded.
- Enter the URL for the png image for the face of the tile.
- Enter the URL for the png image for the back of the tile, I usually use the same as the front to save the effort of making a separate image.
- Set the thickness of the tile, I like 0.20.
- You can make it stackable by setting the Stackable Checkbox.
- Check Stretch to Aspect Ratio, so tile is same shape as image.
- Click on Import. At this point you should have a tile that has your image on the face of the tile.
- Right Click on the tile, give it a name on the bottom of the menu list. In this case Aircraft Throttle. This makes it easier to find it later on.
- Right Click on the tile, got Scripting / Scripting Editor.
- Click on the button on the left side of the window that says "Aircraft Throttle".
- Click on Lua button on top left of Window, this moves you into the LUA code of the object, it should be blank when you start.
- Copy and paste the code below into the code window.
- Click on the save button.
- At this point you can save the object by Right Clicking the tile and selecting Save Object {this allows the object to be imported via import saved objects into other games}. To keep the control in the game you are creating you should save the game iteself.
The following code block can be pasted into the code window.
-- this method is required, in that it gets triggered when
--  the object gets loaded. This allows it to set up the
--  objects state from the previous saved data.
function onLoad( saved_data )
    local loaded_data = JSON.decode( saved_data )
    throttle = loaded_data.throttle or 0

    generate_button_parameters()
    create_buttons()

end


-- this method is required, in that it will save the state of
--  the control.
function onSave()
    data_to_save = {}

    data_to_save[ "throttle" ]  = "throttle"
    data_to_save.throttle = throttle

    saved_data = JSON.encode( data_to_save )
    return saved_data
end


-- this method will add ten to the throttle speed, to a
--  maximum of 200.
function add_ten()
    throttle = math.min( throttle + 10, 200 )
    update_value()
end


-- this method will subtract ten from the throttle speed, to a
--  minimum of 0.
function subtract_ten()
    throttle = math.max( throttle - 10, 0 )
    update_value()
end


-- this method will update the dummy button that holds the
--  throttle speed.
function update_value()
    self.editButton( { index = 0, label = tostring( throttle ) .. ' mph.' } )
end


-- this method creates the buttons and populates the displayed speed.
function create_buttons()
    value_button_parameters.label = tostring( throttle ) .. ' mph.'

    self.createButton( value_button_parameters )
    self.createButton( plus_ten_button_parameters )
    self.createButton( minus_ten_button_parameters )
end


-- this method does nothing, it is just a catch for click events
-- for button clicks from the "throttle speed label button".
-- @todo find a better way to do this.
function dummy_function()
end


-- this method contains all the specifications of the buttons.
function generate_button_parameters()
    value_button_parameters = {
        click_function = 'dummy_function', function_owner = self, label = '',
        position = { 0, 0.1, 1.4 },
        width = 1200, height = 350,
        color = { 0.392, 0.47, 0.77 }, font_color = { 1.0, 1.0, 1.0 },
        font_size = 250
    }
    plus_ten_button_parameters = {
        click_function = 'add_ten', function_owner = self, label = '+10',
        position = { 1.65, 0.1, 0.0 },
        width = 600, height = 900,
        color = { 0.392, 0.47, 0.77 }, font_color = { 1.0, 1.0, 1.0 },
        font_size = 200
    }
    minus_ten_button_parameters = {
        click_function = 'subtract_ten', function_owner = self, label = '-10',
        position = { -1.65, 0.1, 0.0 },
        width = 600, height = 900,
        color = { 0.392, 0.47, 0.77 }, font_color = { 1.0, 1.0, 1.0 },
        font_size = 200
    }
end
Code Walk-Through
Here is how the code actually works on a method by method basis.
- onload method.
- The onload method is an event that is called on each object when they are first load/created in TTS. ( Tabletop Simulator API )
- It is passed a string version of the JSON object that was saved the last time the object was saved, if its has never been saved a nil is returned. The string version is then converted to a object via JSON.decode. The converted value is then or'd with 0. This is a easy coalescing mechanism in LUA.
- We then call the method to generate the parameters for the buttons.
- We then call the method to create the buttons with the parameters defined.
- onsave method.
- The onsave method is an event that is called on each object when the object is saved as a part of the game being saved. ( Tabletop Simulator API )
- First we define a table, the name of arrays in LUA.
- We create a key / value pair, so our table would contain "throttle" : throttle, where throttle would be the current value of the throttle.
- We then convert the table to a string using JSON.encode.
- add_ten method.
- The throttle value is increased by 10. We then use the method math.min to return the smallest value of either the current throttle or 200. This allows us to set the maximum throttle to 200.
- We then call the method to update the display button value.
- subtract_ten method.
- The throttle value is decreased by 10. We then use the method math.max to return the largest value of either the current throttle or 0. This allows us to set the minimum throttle to 0.
- We then call the method to update the display button value.
- update_value method.
- The method calls the objects editButton method and tells it to change the first item { index = 0 } to change its label to the new throttle value, adding the text "mph" to the end of the throttle. ( Tabletop Simulator API )
- create_buttons method.
- First we define the new label of the Throttle value to the amount with the "mph" added.
- We then create each button using the parameters defined. ( Tabletop Simulator API )
- generate_button_parameters method.
- We define each button and their characteristics. ( Tabletop Simulator API )
- click_function defines the name of the method called when a user clicks on the button.
- function_owner defines the location of the click_function { in this case itself }.
- label defines the text displayed on the button.
- position defines the x, y, z coordinates of the button, in comparison to the dead center of object it is attached to ( in this case the custom tile).
- width defines the width of the button.
- height defines the height of the button.
- color defines the RGB Value of the button background, range is ( 0..1, 0..1, 0..1 ).
- font_color defines the RGB Value of the button text, range is ( 0..1, 0..1, 0..1 ).
- font_size defines the height of the font relative to the object { in our case the custom tile }.
- We define each button and their characteristics. ( Tabletop Simulator API )
Pictures